Wednesday, June 29, 2011

New Bookcases For the Living Room

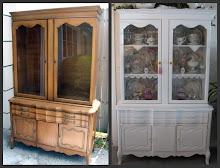
When I started the conversion to cottage style decor in 2008, I was on  a painting frenzy to change all my dark furniture to white.  One of the pieces I painted was an old 3 piece wall unit we had purchased many, MANY years before, back in the late 70’s!

IMG_0394 (C&E)

IMG_0534 (C&E)

Although the wall unit was way out-dated, it did afford me lots of storage and display space but after moving to the house in Hooterville, it didn’t take me long to realize that wall unit just wasn’t going to work well in this new house.  In addition, the 3 pieces really needed a fresh coat of paint.  It was a HUGE  job to paint this beast the first time around so I was not up for the challenge of painting it  again now, especially when I wasn’t happy with it in this house and I have so many other projects on my “To Do” list.

I decided it was (past) time to let the wall unit go so recently my hubby and I hauled all three pieces up to the main road and left them there, hoping a passing motorist or neighbor would come along and adopt them.  Before we had even gotten out of sight, someone was stopping to check them out!

With no wall unit anymore, I needed someplace to display my late grandmother’s milk glass pieces, as well as some of the trinkets and treasures I kept when I purged stuff  before our move to the house in Hooterville so I started looking for something that would work in the new living room.

I found this and based on all the positive reviews, I decided to order two  of the 36 inch size in white.   My hubby was able to get them assembled this past weekend.

Well….I suppose for the price, they aren’t bad but there were a few things I didn’t like about them.

The back piece was folded in half for shipping, which is typical for this kind of furniture, but when it was opened up and attached to the bookcase, there was a large and very noticeable vertical gap.

IMG_3283 (C&E)

I ended up filling the gap with white caulk but it still shows more than I would like.  Eventually, I may end up covering the backs with bead board wallpaper.

There were also some gaps where pieces were joined.

IMG_3284 (E)

I filled them with white caulk too and it looks better.  More seamless.

IMG_3306 (C&E)

Once I got the bookcases caulked and all my nick-nacks arranged, I was pleased with the way they look flanking my sofa. 

IMG_3309

That picture (temporarily) propped on the back of  the sofa was in the living room in  my previous home and the green mat looked really nice on my light sage green walls there.  Obviously though,  it’s not working with the pale gray I painted the walls here.   I plan to keep the big, chunky white frame (it cost me an arm and a leg!) but I am debating whether to keep the print and have just the green mat replaced, or have  both  the  mat and print replaced.  I haven’t decided yet.

And I’m still working on the area directly across from the sofa.    There’s lots left to do on that side of the room!

Monday, June 27, 2011

I Love Flip-Flops

Ever since I retired from the business world in 2007, I have pretty much lived in flip-flops.  Here in Florida, we can almost wear them year-round.

I SERIOUSLY love flip-flops!

Why do I love flip-flops so much?  Well, that's an easy question to answer!

  • They are easy to slip on and off.

  • They are cool and comfortable.

  • One of my guilty pleasures is regular pedicures and flip- flops allow me to show off whatever pretty color  polish I have on my toes. 

  • The styles and colors are endless.

  • They’re cheap.  Most of the time I pay far less than $15.00 a pair so a shoe-a-holic, like me, can have a pair of cute flip-flops in every color to match every outfit, without breaking the bank.

flip flops on a clotheslineDid I mention, I think they are really comfortable???


Now, if you are like me and love flip-flops, you probably have at least a few (and possibly way too many) pairs.

flipflopqueen

And maybe if you have a *few* pairs of flip-flops, the bottom of your closet just might look like mine. 

IMG_3289 

(YIKES!  It’s a wonder I can even find a matching pair in that mess!  Believe it or not, I’m such a neat freak in most all other areas of my life.)

The other day, I was blog hopping and on the blog, EPBOT,  I ran across the most ingenious idea for keeping flip-flops neatly organized.

4.bp.blogspot

Isn’t that fabulous?!  This is definitely one of those ideas that makes you say, “Why didn’t I think of THAT?”

I am SO going to put this on my list of projects!

If the bottom of your closet is covered with a messy mound of flip-flops like mine, go check out her easy  tutorial on how to make these flip-flop hangers.  (She also shows how the hangers work for ballet flats too, if those are more your thing).

Wednesday, June 22, 2011

I’m Calling This Bathroom *DONE* ! (For Now)

The (drywall) dust was flying again this past weekend at the house in Hooterville

If you have been reading my blog for awhile, you might remember one of the first rooms I fixed up in this house was a bathroom right off the breakfast room.  This was the way it looked the day we looked at the house.

IMG_0588 

Now, if money were no object, I would have gutted it and started from scratch but there were other rooms that offended me more so I just decided to replace the toilet and do a cosmetic makeover with paint, fabrics and a few accessories.

IMG_1482 (E)

But this is what it looked like this weekend! 

IMG_3270 (C&E)

When we gutted this bathroom, we took the old light fixture from there to replace the “Hollywood” light that was in here.  The existing electrical box for the light over the sink was too low and the *new* light fixture had to be hung upside down in order to be able to open the doors of the medicine chest/mirror.  It’s been precariously hanging upside down for six months.

This weekend my hubby moved the electrical box up and dry-walled over the old hole.

IMG_3272

If you’ve ever had any drywall work done in your home, you know it’s a messy proposition.  Every surface ends up looking like this.

IMG_3273

Fortunately, everything is now cleaned up and the light is hanging the right way.  (Scratch one more project off the “To Do” list!)

IMG_3277 (E)

And since I no longer have a slew of workmen using this bathroom and leaving the toilet seat up, I removed this *lovely* piece of “artwork” which was hanging over the toilet…

IMG_1112 

…and replaced it with something a little prettier.

IMG_3275 (C&E)

IMG_3279 (E) 

I do believe this bathroom is *DONE*.    Well, at least done until I feel like we can afford the time and money to replace the tub, shower tile,  vanity, medicine chest/mirror and install new flooring. 

Tuesday, June 14, 2011

16 Reasons Why I’ve Been a Bad Blogger

I’ll readily admit I have really been a bad blogger lately and I do apologize to those of you who come here looking for updates on the house in Hooterville

Here’s a small sampling of why I haven’t been blogging much.

Reason #1: 

IMG_3089 (C&E)

I tweaked and then repainted a rack I purchased at HomeGoods, making it into a combination towel rack and small shelf for the new bathroom.  (Towel rack functions beautifully, and is unique and unexpected but not sure I’m happy with the accessories yet.)


Reason #2: 

IMG_3216 

Finally, 7 months after the kitchen re-do, I spent 2 days emptying drawers in the new kitchen and lining them with pretty shelf paper.  In all fairness though, it did take me that long to locate this Contact paper I had seen many months before the kitchen was even started.   I was hesitant to buy it then, not knowing how much I was going to need and then afterwards, nobody seemed to have it anymore.  I recently found it at Target.  (One of these days I’ll get around to taking updated kitchen pictures with the backsplash, lighting and the few accessories I’ve found so far.)


Reason #3: 

IMG_3248 (C&E)

I’ve been trying to do a little accessorizing here and there.


Reason #4: 

IMG_3247 (C&E)

Some of my walls are no longer bare.  We’ve been able to get some pictures hung so it actually looks like somebody lives here!


Reason #5:

IMG_3215 (E)

I repainted a picture mat (and the frame) on a piece of artwork I had used in the other house so it would better fit in with the paint colors in this house. 


Reason #6: 

IMG_3264 (C&E)

 Seven months ago, when we tried to get the new refrigerator in the house, it was just a wee bit too wide to fit through the door so Hubby had to pop off the molding around the door jamb.   I just recently got around to re-caulking and repainting the trim around that door.   The door also got another fresh coat of paint because it’s a heavily used entrance/exit.


Reasons #7, 8 & 9: 

IMG_3257 (E)

I’ve worked on the front porch

the ceiling has been painted a light blue,  I painted the shutters black, and got 2 lanterns hung. (Need to make a decision on furniture and cushions SOON…before summer is over!)


Reasons #10 & 11:

IMG_3224 (C&E)

I painted a cute (formally white) petite chandelier black and hung it over the sink in the laundry room.


Reason #12: 

I was Hubby’s assistant while  he did some electrical work to accommodate the chandelier.  Sorry, no photo available.  ;)


Reasons 13 & 14: 

IMG_3260 (C&E)

It only took about 8 months after installing the bottom cabinets, but we FINALLY got the upper cabinets assembled and hung on the sink wall in the laundry room, and I applied wall words, 

“Self Serve Laundry Open 24 Hours.”

(Still much work/accessorizing to do in here.)


Reason #15: 

IMG_3255 (C&E)

Got the valance (that I’ve had for MONTHS) hung over laundry room window.


Reason #16:

IMG_3235 (E)

I decided I definitely needed to repaint the formal living  and dining rooms.  I felt like the original bluish- gray color (Valspar “Winter in Paris” ) was just a little too dreary (and too blue)  for my liking in these north facing rooms.


Now that the repainting of the formal living room is done, maybe I can finally get my furniture arranged so it doesn’t look like this anymore…

IMG_3253

And maybe I can get the rest of the boxes unpacked so my formal dining room doesn’t look like this…

IMG_3252

Good grief!  Three months after moving and there is still no rest for the weary.

Tuesday, June 7, 2011

Tea For Two at Camellia Rose Tea Cottage

Recently, when my friend, Debbie, came from New Jersey to visit me for a week, we spent one  afternoon having tea at a lovely tea cottage not too far from the house in Hooterville.     Although I had heard about the Camellia Rose Tea Cottage and seen it featured by several bloggers, this was my first time there.  It did not disappoint!

IMG_3175 (C&E)

Our table was by one of the windows and the window sill was filled to the brim with crystal candlesticks, silver pieces, tea pots and tea cups.  So pretty!

IMG_3131 (C&E)

Debbie and I both have a mutual love of pink roses so I guess it was quite fitting there was a bud vase of  pink roses on our table.

IMG_3145 (C&E)

The table setting was lovely…old silver, pretty rose patterned china, pressed glass water goblets, and  a beautiful crocheted piece was layered over the tablecloth.   An old photograph placed under the glass added  vintage charm. 

IMG_3129 (E)

The selection of fresh brewed loose leaf teas at Camellia Rose is so extensive, Debbie and I had a difficult time deciding which teas we wanted to try.   In the end, we sampled three different pots of tea and loved them all!

IMG_3132 (C&E)

The  broccoli cheddar soup, served in a tea cup,  was to die for;  the BEST I have EVER had!

IMG_3136 (C&E)

We were served a three tier curate with tea sandwiches (on the middle tier), fresh baked blueberry scones  and southern style Devon cream (on the bottom tier) and a sampling of three types of yummy little desserts (on the top tier).

IMG_3137 (C&E)

Debbie 1

Every corner of the Camellia Rose Tea Cottage is just oozing with charm.

IMG_3143 (C&E)

IMG_3141 (C&E)

IMG_3142 (E)

Notice the high ceilings and gorgeous, thick crown moldings!

IMG_3135 (E)

This  feminine vintage  dress was displayed in one of the windows.

IMG_3170 (C&E)

Whimsical fairies hung in another window.

IMG_3173 (C&E)

IMG_3172 (C&E)

IMG_3174 (C&E)

IMG_3171 (C&E)

IMG_3168 (C&E)

IMG_3157 (C&E)

The gift shop/boutique offers an assortment of tea-related items for sale.

IMG_3163 (C&E)

IMG_3150 (C&E)

IMG_3152 (C&E)

They also sell some beautiful candles, hand-made soaps and toiletries.

IMG_3155 (C&E)

IMG_3156 (C&E)

IMG_3159 (C&E)

This  crystal and silver powder duster caught my eye.   It was so elegant!

IMG_3159 (C&E) 2

IMG_3160 (2)

Oh, hello!  (Thought I’d try my hand at a self-portrait in the gift shop mirror.)  Camellia Rose is located in the historic Bank of Plant City building and in this photo you can see the original tile floors that date back to 1919.

IMG_3158 (C&E) 

Even the Powder Room at Camellia Rose is pretty!

IMG_3164 (C&E) 

IMG_3165 (C&E)

IMG_3166 (C&E) 2 

Afternoon tea at Camellia Rose Tea Cottage was so special.  There is nothing like a good cup of tea shared between good friends!

IMG_3148 (C&E) 

The Camellia Rose Tea Cottage is located in historic downtown Plant City, Florida which is approximately 30 minutes east of Tampa.