Sunday, July 31, 2011

A Special Keepsake Made With Wedding Gown Lace

Earlier this year, while I was purging stuff in preparation for our move to the house in Hooterville, I mentioned in this post how I had made the decision to part with the wedding gown I wore when I married my hubby in 1972. 

laceCFinal640 Before I let the dress go though, I cut off a small piece of lace and asked  Joy of Cupid’s Charm to incorporate it into a special keepsake.  Joy turns vintage jewelry, broken china, old silver spoons, vintage photos, papers, lace, crystals, pearls and sterling beads into the most beautiful and romantic pieces of jewelry you have ever seen.

When Joy was done working her creative magic, the charm bracelet below was the result.   

My bridal gown lace bracelet-Cupid's Charm 

In addition to Swarovski crystals, pearls and sterling beads, she combined 3 heart-shaped charms made with broken china pieces and 4 charms containing lace from my wedding dress.

Let me tell you, the bracelet  is absolutely exquisite in person!  I am sure this gorgeous bracelet is destined to become a family heirloom.

Originally, I had planned to gift my daughter with this special bracelet on her 30th birthday next June.  However, I decided to give  it to her early so she could wear it to the special premiere event she attended last week in California.

If you pop over to Joy’s on-line shop to browse, don’t blame me if you want one of everything!  :)

Linking up to:

Metamorphosis Monday #132 @ Between Naps on the Porch

Wow Us Wednesdays #25 @ Savvy Southern Style

Show & Tell Friday @ My Romantic Home

Wednesday, July 27, 2011

Tango’s Movie Debut

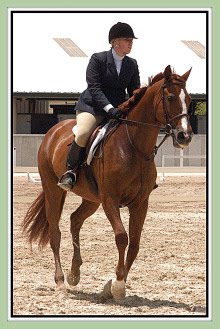
Last September, my daughter’s horse, Tango, was used  in some scenes for a movie that was being produced by singer/songwriter, Bertie Higgins, and directed by Bertie’s son, Julian. 

IMG_2110 (C&E)L to R :  Bertie Higgins, Bianca (who plays “Elena” in the movie),  Tango,  my daughter, Bertie’s son, Julian (the director), and Robert (who plays “Jack Hooks”)

 If you are new to my blog and would like to read the details of how Tango got the part in the movie and see some of the photos from her first day of filming,  you can click   here.

It would seem movie making is a long process.  After all these months, the movie is finally finished and I am now able to share more information about it, as well as a couple video clips.  

The name of the movie is THROUGH THE EYE and a synopsis of the storyline can be found  here.

This short video clip was from Tango’s second day of filming.  The movie character, “Elena,” riding Tango, is being chased by a dune buggy driven by the actor playing  “Carlos Huerta,” the head of the Colombian drug ring.  

If you know anything about horses, you know they can  sometimes come completely unglued and spook over the smallest and stupidest little thing so there was some uncertainty about how  Tango was going to react when  she was left standing alone after the actress dismounted and that very loud and fast-moving dune buggy came roaring up behind her.  Would she freak out and take off running?  As you can see in the video, she just did a little side hop  out of the way and meandered out of camera range.  Way to go, Tango!

The premiere screening of THROUGH THE EYE  was held in Pasadena, California Tuesday night, July 26, 2011.  

My daughter was invited  to the premiere screening and imagine our excitement when we saw Tango’s picture  on the premiere  invitation!

Through_the_Eye_Premiere_Invitation_e 

Tango is also seen briefly in the movie trailer below.

There was no way my daughter  was going to miss this momentous, once-in-a-lifetime opportunity to attend this premiere event so she flew out to California Monday afternoon.  I can’t wait to get her assessment of the movie and hear how Tango looked on the big screen.  In relation to the length of the movie, I’m sure Tango’s scenes will most likely be very, very, VERY short but we are as excited as if Tango had the starring role!

Even though I’m not an avid movie-goer and typically I avoid action movies because they tend to be violent, this is one movie I’m obviously anxious to see.  I don’t have any information yet on how/when/where THROUGH THE EYE  will be available for the general public to see but I’ll keep you posted,  just in case you’d like to see it too .  Then you can  say, “Hey, I *know* that horse from Blogland!”   ;) 

Linking up to:

 Wow Us Wednesdays #24 @ Savvy Southern Style

Show & Tell Friday @ My Romantic Home

Monday, July 25, 2011

My Camera

This afternoon, my little pocket-sized blogging camera is on a plane headed for California.


my camera


No, it’s not going to a repair shop; it’s actually working well.

I’m not really at liberty to reveal WHY my camera is going to California just yet but I can tell you the reason is quite exciting (at least to us).   I can also tease you a little bit and say it has something to do with this post.

I’ll be able to share the details  later this week, probably Wednesday.  :)  And hopefully, sometime after that, I will have some fun photos to share of the California trip.

Oh, and in case you were wondering…I am NOT on that plane with my camera!

Wednesday, July 20, 2011

Oh No… Here We Go Again!

If you were reading my blog about a  year ago, you probably remember the hhGregg/Samsung front load washer ordeal and the months and months of consumer’s hell I went through to return the defective washer. 

After hhGregg finally took  the washer (and dryer) back in August 2010,  I replaced the Samsung set with a Whirlpool Duet front-loading steam washer and dryer.

I’ve been very pleased with the new machines’ performance…

…until today. 

I walked into my laundry room this afternoon to find water pouring out from underneath the washer.

What the heck?!  

sad face

It was all I could do not to sit down and cry.

And, wouldn’t you know,  the 12-month interest free promotion on the Lowe’s credit card is almost up.  In order to avoid a year’s worth of interest, the washer and dryer balance had to be paid off  by July 26th.  As my luck would have it,  I just mailed the payoff check two days ago. 

TWO DAYS AGO! 

Of course the washer is still under warranty, but if it turns out I have another washer with a chronic defect, I won’t have any consumer leverage for return and/or replacement this time since the washer and dryer balance has been paid off.

The repairman is coming tomorrow afternoon.   I’m going to think positive and hope  the leak  was just caused by a small problem that requires an easy, one-time  fix.

Thursday, July 7, 2011

Sewing a Faux Roman Shade

This week, I attempted to get reacquainted with this old gal. 

IMG_3319

It’s been a  long time since we spent any time together. 

A very, very long time.

I’ve mentioned before that my mother was a very talented seamstress and loved to sew but I didn’t get passed the sewing gene.  I am more than capable of sewing if it is a necessity, but  it’s not something I enjoy so I have always made it my mission to avoid  it whenever possible.  In past years, any time I could get my mom to sew for me, I would.  However, since she passed away six years ago, if I need/want any sewing done now, I’m on my own. 

A couple months ago, I saw a really simple tutorial for a  faux Roman shade.  It was so ingenious, I wanted to try it for my kitchen window so I bookmarked it.   I won’t repeat the tutorial here.  Just click the above link and scroll down to the middle of that post for the instructions. 

Even with the 50% off sale Joann's Fabrics was having on the special order home decorating fabrics, the fabric I chose (P. Kaufmann Sea Breeze Patriot) was $19.99/yd.   I wasn’t even sure I was going to like this faux Roman shade once I got it  done so I only ordered a yard of material but that meant I wouldn’t have enough length to double the fabric over the top rod per the tutorial instructions.  I planned to compensate for this by sewing a pocket to slip the top tension rod through.

Yes, I was actually going to SEW!

I dug out my (almost 40 year old) sewing machine.  After dusting her off, I reviewed the owner’s manual to refresh my memory on how to fill the bobbin.  Like riding a bike, it came right back to me.

IMG_3318

I threaded her up, slipped my fabric under the presser foot, hit the foot pedal and……

NOTHING.

She hummed a little but the needle wouldn’t move and upon closer inspection, all the parts seemed to be a bit rusted and bound up. 

I can’t imagine why it wouldn’t sew.   (Insert sarcastic tone.)   The last time I can really remember using this sewing machine, my now 29-year-old daughter was in the fourth grade. 

Yeah, I guess if you store a sewing machine in the backyard  shed where it gets exposed to the intense heat and humidity of Florida’s  summers  for 20+ years, things are bound to be a bit rusty and bound up.  The light bulb  still worked after all these years though!

Plan B:  Make this a no-sew project (like the tutorial) by using hem tape. 

Unfortunately, that was a fail for me too as my fabric was a bit too heavy and nubby for the hem tape to hold  well.

Plan C:  Buy a new sewing machine.   Ugh.

I actually have a couple other simple sewing projects I want to do in the coming weeks so I got on the Internet to check out some inexpensive, basic machines.   I didn’t want or need a bunch of bells and whistles, just something to do some straight stitching.

Most of the machines I looked at under $100 didn’t get very good reviews.  This machine did more than I would ever need but it had a very high number of positive ratings.

Brother cE5500PRW 

I  decided to jump  in the car and go to the nearest Walmart to see if they (hopefully) had it in the store.  I didn’t want to order anything online.  I was ready to do this Roman shade project now!

It must have REALLY been my lucky day.  Not only did Walmart have it, but it was on sale for $109.00!  A savings of almost FORTY-ONE DOLLARS! 

Finally, I was off and running.

IMG_3322 (C&E) 

My kitchen window is small, only 36 inches by 36 inches, and I found that for my liking, too much of the light and view were obstructed by fabric when I inserted the tension rods into the window frame.    (I tested this before I did any cutting or sewing.)

By using the cabinets on either side of the window to support the tension rods, I was able to  raise the rod higher to give the illusion of  a larger window and then only  the top 1/3 of the window was covered.  Although, after looking at these photos, I think the top rod could be raised even a bit more.

IMG_3342 (E)

My fabric was wider than the width between the cabinets so I added 2 inches to that measurement so I could sew a one inch hem down each vertical side of the fabric.  For the length, I used the whole yard of fabric and  put a one inch hem in the bottom.  As mentioned above, I sewed a pocket across the top for the top tension rod to slip through.

IMG_3356 (C&E)

 I was  quite happy the way this turned out.  It was easy and would have been quick…had I not had to stop to research sewing machines, run out to buy one, set it up and learn how to use it. 

If I decide to ever make another faux Roman shade using this tension rod technique, I would probably do it this way again.  The single length of fabric and the rod pocket worked  fine, thus cutting the expense of fabric in half.

IMG_3335 (C&E)