
A nice visitor to my blog, Sandra, told me via email she and her husband just bought their first home and decided since it is in the country they would like to decorate it in Cottage Style that is French inspired. They want to paint and distress some furniture they already have, as well as second-hand pieces they might be able to pick up in the future through their local Craigslist, so Sandra asked me to explain the steps I used to paint and distress the chest and nightstand in my French country cottage guest bedroom/office.
On the one hand, I am extremely flattered but I am also somewhat apprehensive because I don't claim to be an expert at painting furniture. I'm sure I don't do it the "right" way, and certainly not the way a professional would. However, with that disclaimer out of the way, I will share with you and Sandra what has worked for me.
First, because I knew I was going to be doing A LOT of furniture painting during my conversion to cottage-style decor, I decided to invest in a basic airless sprayer. I bought mine at Lowe's for about $100 but I believe there might be a cheaper model.
Without a doubt, it was $100 well-spent. I have painted more than 15 pieces of furniture…some of them quite large…and having the sprayer has made the painting process so much quicker and easier. If you can buy, borrow or rent a sprayer, I highly recommend it. You can thank me later.
**Edited to add: When I originally wrote and posted this tutorial, I included a photo of a Wagner sprayer that appeared to be the newest model of my paint sprayer. Upon further investigation, I found the photo I posted was not the current model of the sprayer I use. I have removed that photo. The one pictured here now is like the one I use…the Wagner Control Spray Plus. I am sorry if the incorrect photo has caused any confusion or problems for anyone reading this tutorial.

I found this sprayer to be very user friendly and there are only a few parts to disassemble for cleaning, which makes cleanup a breeze.
Certainly though, a paint sprayer is not mandatory to paint furniture. Good results can also be achieved with a brush and roller. It's just going to be more tedious and time consuming.
PREP WORK: I am fairly very lazy when it comes to prep work. (If there are any pros reading this, here’s where they are probably groaning and rolling their eyes.) I don’t bother with stripping off the old finish and I hate to sand. Hate it! Out of 15+ pieces of furniture I have painted, I only stripped and sanded one thing...my little buffet table and that's because the finish on it was really in bad, bad shape.
Before I painted my first piece of furniture I did do a lot of research on the internet trying to learn the dos and don'ts of furniture painting. I found one website where a professional furniture refinisher said he never sands. Don’t you know THAT was music to my ears! He said he used a liquid sandpaper, specifically Klean Strip Sander Deglosser. I thought if it was good enough for a professional, it was certainly good enough for me.

There are other brands of liquid sandpaper/deglosser too but Klean Strip is the only one I have personally tried. I found it at Home Depot. Let me tell you, I think this stuff is awesome! What a time-saver! You simply wipe it on the piece you are going to paint. So easy! It cleans off any dirt and grime that might be on the furniture and leaves a slight tackiness so your primer will adhere well to your furniture. Then within an hour of using the liquid sandpaper, you apply your first coat of primer.
If the finish you are painting over is in relatively good shape, I think the liquid sandpaper will work just fine, thus eliminating the step of pre-sanding.
PRIMING: I always apply at least one coat of primer, but usually more. When using a sprayer, it's always better to spray several light coats rather than one heavy one. Light coats dry faster and harder, and you have less chance of runs or drips.
I have used both Kilz primer and Zinsser Bulls Eye 1 2 3 primer. Either will work fine. I only use latex products. I can’t be bothered with the messy cleanup required with oil based products. I’m lazy, remember?


PAINTING: I use interior latex paint but the brand and sheen is strictly a matter of personal preference. I like my furniture to have a satin finish...not too flat...not too shiny. Interestingly though, I found that satin paint does not look like satin when it is applied with an airless sprayer. It comes out looking more like flat or "eggshell", possibly because it is necessary to dilute the latex paint with quite a bit of water to get it to run smoothly through the sprayer. Therefore, if you are using an airless sprayer, I would recommend going one step up to the next higher sheen level than you actually want your finish to be. I use semi-gloss to achieve a satin finish. If you are using a paint brush or roller, buy the sheen level you want your finished piece to be.
Also, if you are going to use an airless sprayer, the sprayer instructions tell you to dilute your (latex) paint (or primer) with water. Therefore, one quart of paint (or primer) will go a long, long way. If you only have a couple small things or one large piece to paint, there is no need to buy a whole gallon of paint (or primer).
Like the primer, the paint should be applied in several light coats if you are using an airless sprayer. Actually, it is not uncommon for me to apply 4 or 5 light coats of paint to get the coverage I want. But don't despair! I know that sounds like a lot of work but using a sprayer, you can actually apply a light coat of paint to a large piece of furniture like a china cabinet in less than 10 minutes and it will be ready for another light coat in 20 or 30 minutes, maybe even sooner depending on the weather conditions you are working in! With a paint sprayer, this goes really fast people!
WET SANDING: The sprayer generally produces a nice smooth finish but sometimes, for whatever reason, your final finish might not be quite as smooth as you would like. After your paint has thoroughly dried and cured, it can be “wet sanded” to achieve a super smooth finish. If done with a very fine grit sandpaper and lots of water, it should not dull, mar or scar a glossy finish.
Wet sanding is an optional step. Some of my furniture pieces have been wet sanded. Some have not. Some have been wet sanded in certain areas but not all over.
For any sanding I have to do, I like to use the 3M Sanding Sponges because they are a comfortable size for my hand.

I dunk the sanding sponge in a bowl of water frequently to keep it very wet. I will even sprinkle some water right on the area I am sanding. Remember, your wood has been protected by several layers of primer and paint so the water will not hurt it. I found that liberal use of water is the biggest key to preventing the sandpaper from dulling your satin or semi-gloss finish. Once you have finished wet sanding, use a clean wet cloth or sponge to thoroughly wipe off the residue .
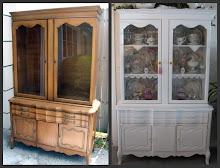
DISRESSING: The majority of the painted furniture in my house is NOT distressed. However, I did distress the chest and nightstand in my French country cottage guest room because I felt like it added to the look I was trying to achieve. To distress those pieces, all I did was use a 3M Sanding Sponge to sand off the paint down to the wood on the "high spots," edges or any place where natural wear and tear would normally occur.


In my opinion, there really is no “right” or “wrong” way to do this. Personal preference dictates whether you distress a little or a lot. If you’ve never done any distressing before, start out conservatively and just sand a few areas. Then, if you think it needs more, gradually increase the number of areas you sand until you are pleased with the way it looks.

CLEAR PROTECTIVE COAT: You might be wondering about applying a clear coat product like polyurethane over painted pieces. Personally, I DO NOT use it on my furniture for a couple reasons. First, I think even the "non-yellowing" products have a tendency to change the color of the paint, especially over time. I don't want my white painted furniture to have a yellowish tint. Second, I don't want most of my furniture pieces to have the "chippy" or "distressed" look. We aren’t hard on our furniture here in My Cottage of Bliss but if I don’t use a clear coat over the paint, I can easily come along with a little paint brush and touch up the paint if it does happen to get chipped or dinged from everyday use.
If your furniture really takes a beating from kids and/or pets and you think you need the extra protection, and you don’t mind the slight discoloration of your paint color, then by all means, feel free to use a clear protective finish after your final coat of paint has dried thoroughly. Ultimately, you should do what you think will work best for your particular situation. There are no rules.
A fellow blogger, Cindy @ My Romantic Home has done a lot of furniture painting too. She is very good at it and I have always admired the results she gets. She has put together a great tutorial here. For anyone who is considering painting furniture to achieve the cottage look, I would recommend reading her step-by-step instructions too because she does some things differently than I do. She has also covered some steps that I have not, such as applying appliqués, using accent colors, and waxing.
Above all, remember, the cottage look is all about casual, “used” and “usable”, not perfection. To quote The Nester … “It doesn’t have to be perfect to be beautiful.”
So true.
**Please note: I have no affiliation with any of the brands mentioned above, nor have I received any compensation from these companies to mention their products here.


+R+(3)+tilted.jpg)


+green+frame+template.jpg)

+(E).jpg)
+(E).jpg)

+green+border+template.jpg)
.jpg)


21 comments:
Terrific post! Perfect for me! I am about to paint a LOT of furniture!
I've never used a paint sprayer before. Sounds like it would save a lot of time! I really appreciate your tutorial!
Been wondering about oil or latex primer... I'm glad to know that latex will do the job just fine!
Most people in the residential place have the agreement for having the best high-end products for the outdoor furniture.
Thank you for the great tutorial-your results are beautiful. Perhaps I will do it the right way next time!
~Nancy
GM My friend..what a great information post you did today...thank you so much for this...I have read Cindy's how to also...I have an old side board in my guest bathroom I want to do shabby...now I can't move it out of the whole its up stairs...so they product can I use them indoors...I don't the sprayer I can't over spray and all of that...but the other's can I...let me know your thoughts on this...May you have a great day my friend...hugs and smiles Gl♥ria
Great information! I think I need a paint sprayer, I spend hours on each piece, that would make my work easier. Hugs, ~cindy s~
I sure wish I had a sprayer! If I had a place to spray I would get one. Since I do most of my painting in my carport, I don't think the other tenants in my apartment would appreciate the over-spray on their cars! haha! I'm going to try that liquid sandpaper! I hate stripping and sanding too and I would love to get rid of that step!
Hi Shari :)
Thank you so much for posting this! I want to paint my kitchen cabinets this fall and this info will really come in handy :)
Oh and Rich and I were married before to other people (12 years for him and 6 for me) so we feel like we're an old married couple after having to put up with ours ex's LOL
We've been together for 5 years now total :)
xo,
rue
Good Morning Sweet Shari!
What an awesome tutorial! Thank you so much....I guess I'm just going to have to buy myself a new sprayer. I did have a Wagner sprayer, but it pooped out....Oh how frustrating. I've painted the last few pieces of furniture with a brush. Not quite perfection, but OK....
Yes, it is a cute love story, isn't it? I love them both so I couldn't be more thrilled. Even my DH is thrilled about it, and asks them both about how it's going all the time!!! It just doesn't get any better than this....well, if they get married it will! :-)
Hugs!
Spencer
great tutorial. I love the distressed look when painting furniture...that way there is less stress about messing it up...because flaws are what you're aiming for!
Shari, this is the second time I have commented on this post, but I am so excited to tell you that my dear hubby thinks that getting a paint sprayer would be a good idea!!! I even have a garage to paint in. But, I could not paint during the winter because it is not heated and it goes to -30 C and lower quite often. But, I see a paint sprayer in my future!! Thanks for the info and the fantastic idea! I just sat here and read through your entire blog today, Cindy @ My Romantic Home was one of the people who got me hooked on blogs, too. I also thought about blogging for a long time, two years, actually. Oh, and I adore your little buffet that you refinished, so-o-o pretty! Hugs ~cindy s~
Beautifully done! These pieces you did are just wonderful. I don't think a professional could have achieved a better result. I would love the see the entire piece sometime. Thanks for all of the great advice on product and technique, too. You have a beautiful blog and I am so happy you dropped by so I could find you.
~J~
Awesome post & I'm saving it!!! ☺ diane
Great post, I will try the wet sanding on my next piece of furniture. sandi
I love how that hutch turned out. I love painted furniture and I feature a lot of it on my blog. I'd love it if you'd come and visit! Thanks for sharing such beautiful things with all of us!
VERY INFORMATIVE..thanks so much.
We ( my husband) paints a lot of my furniture and architectural pieces..and this is excellent info.
Thank you,
Rose
http://delightfulclutter.blogspot.com/
This is a great tutorial! Thank you. I've bookmarked the page for future reference.
You're awesome for posting this. Thanks so much! I plan on doing a lot of furniture painting and this is good to know!
Thanks so much for all this wonderful information, Excited to try this.
Thanks for this post. It was very helpful!
It's 2015 and I am just seeing this tutorial. You put a lot of work and thought into this and I too appreciate you giving out this information. I love painting furniture but have only used chalk paint for furniture. Previously I was doing "re-finishing" which is a lot of work but very rewarding. I no longer have the energy for all that prep and sanding to refinish good wood furniture, so painting is now the way to go. With your tutorial, I now have more information to do some more pieces with latex. Thanks so much.
Post a Comment